ESP32 HTTP GET With OpenWeatherMap and ThingsSpeakcom Circuit Diagram Learn how to build an advanced ESP32 Weather Station using IoT technology. This step-by-step tutorial covers real-time weather monitoring, data logging, and
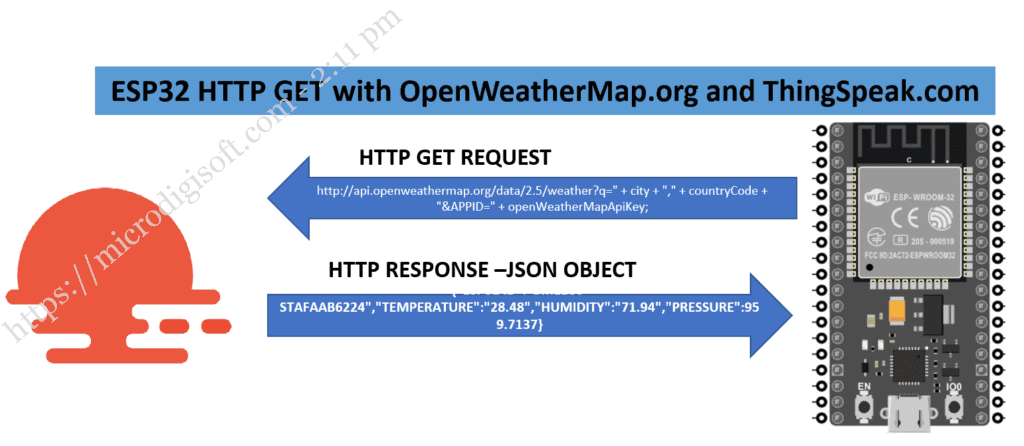
The URL requires the input of three parameters to acquire the weather update for a desired location. These parameters include the name of the city (specified as "q=your_city"), the country code of the city (specified as "your_country_code"), and your unique API key (obtained from the "API keys" tab). This ESP32 ESP-IDF code Gives you outside - real - time weather conditions: Temperature and Humidity; You can modify the interval for the temp and hum. measurements + weather info. by modifying the update_interval # in the code. It is set for 5 minutes. select the device esp32 and add: 4 value displays for: inside temperature using Virtual Pin1, Inside

code/Weather Circuit Diagram
This project serves as an excellent introduction to working with APIs, Wi-Fi connectivity, and data display on an LCD module using the ESP32 board. With the IoT Open Weather Display, you can conveniently access real-time weather updates at a glance, making it an ideal solution for home or office environments. Required Components 0. Download Source Code. For this project, you'll need these files: SQL query to create your table: SensorData_Table.sql Insert and access database readings: esp-database.php Handle HTTP Post requests: esp-post-data.php CSS file to style your web page: esp-style.css Display your sensor readings: esp-weather-station.php Arduino Sketch for ESP32: HTTPS_ESP32_Cloud_Weather_Station.ino

📥 Clone or Download Clone this repository to your local machine. 🛠️ Open the Code Open the .ino file in the Arduino IDE.. 🔧 Initial Setup Upload the code to your ESP32. Upon the first run, the device will host a Wi-Fi setup portal named ESP32-Config.Connect to this network using a smartphone or computer, and follow the web interface to input: Introduction. In this project, we'll create a simple, real-time weather station using ESP32 and DHT11 sensor to monitor temperature and humidity. The ESP32 will operate in Access Point (AP) mode, allowing it to host a web interface that displays temperature and humidity readings in real-time, which can be accessed by any nearby device without an internet connection.
Create Your Own IoT Weather Station: 7 Steps with ESP32 Circuit Diagram
ESP32 supports various protocols, but MQTT (Message Queuing Telemetry Transport) is particularly effective due to its lightweight nature well-suited for low-bandwidth networks. Implementing MQTT will allow you to publish real-time updates on your weather conditions effortlessly.
